Deployment orchestration↑
This guide explains how to install the required components to deploy AQtive Guard Protect, configure them to run in your environment, and deploy certificates.
Prerequisites↑
You’ll need the following:
- A certificate previously enrolled in AQG Protect. Refer to Getting started for details.
- OpenSSL version 3.0.7 or higher.
- A version of nginx that supports OpenSSL 3.0.7 or higher.
- The required scripts, modules, and libraries provided to you in the AQtive Guard Protect release package.
Note
If you didn’t receive the release package, visit our support portal for assistance.
Overview↑
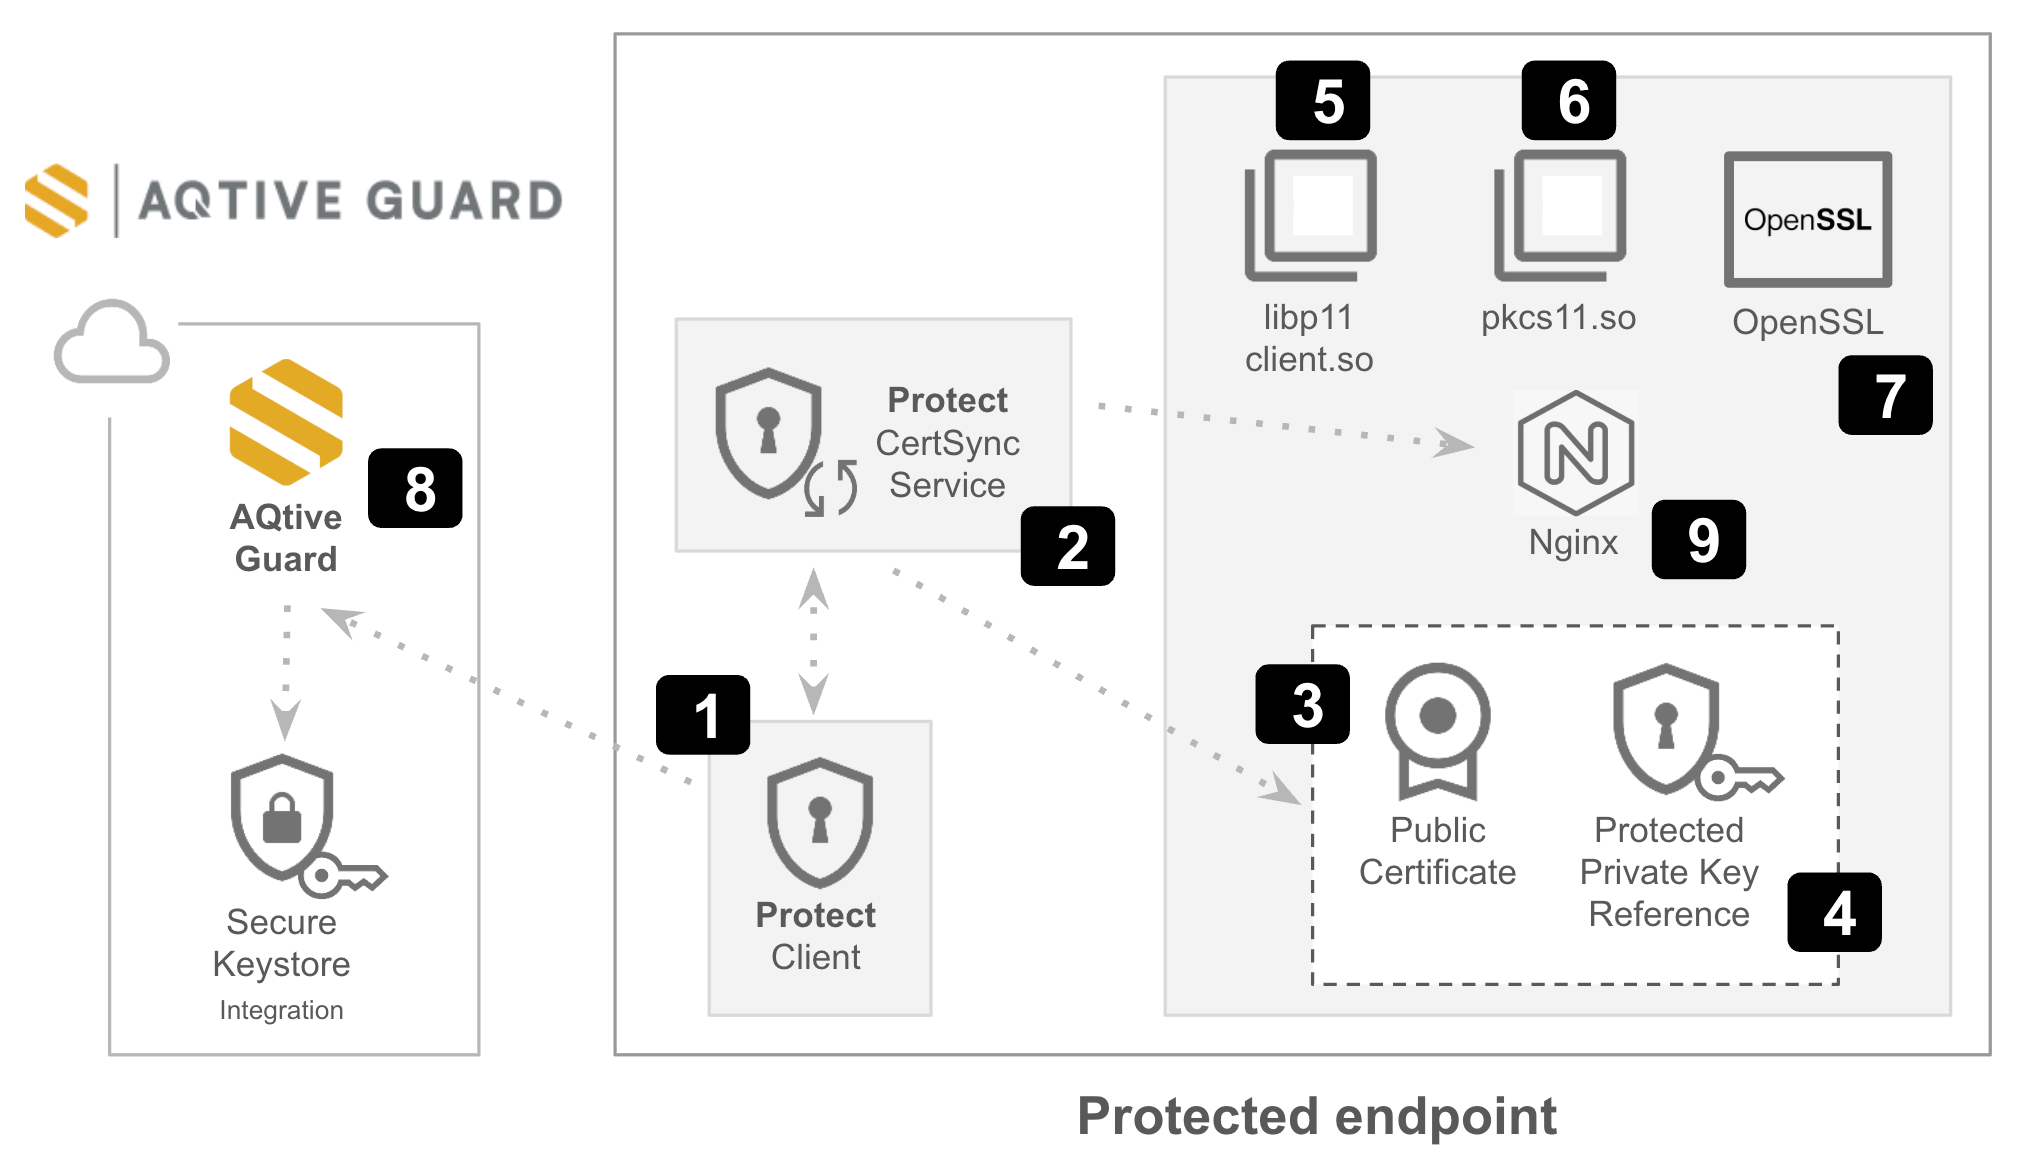
This diagram shows the components for deploying AQtive Guard Protect, and the order in which you install them on the desired endpoint. The following sections provide detailed deployment instructions for each component.
- Install the AQG Protect Client (1) and AQG Protect CertSync (2) service. This will generate an associated Public Certificate (3) and Protected Private Key Reference (4) for that endpoint.
- Install the required third-party PKCS#11 modules,
pkcs11.so(5) andlibp11.so(6). - Configure OpenSSL (7) to use these libraries and the Protected Private Key Reference. This allows the Protect Client to communicate with AQtive Guard (8).
- Configure your nginx (9) setup to use the updated OpenSSL configuration.
Install AQG Protect dependencies↑
Install the protect-cert-sync service dependencies:
Install the Protect client as a systemd service↑
Before you begin the installation:
- Locate the certificate in AQtive Guard that you plan to deploy. You’ll need its details to complete the deployment.
- Create authentication credentials in AQtive Guard.
To install the Protect client as a systemd service, follow these steps:
- Copy the
cert-sync.shanduri2pem.pyscripts from the release package to/usr/local/bin/. -
Make sure the scripts are executable:
-
Follow these steps to obtain the
workloadIdfor the certificate to deploy:- Select Protect from the main menu.
- In the Certificates tab, locate the certificate for which you need deployment information.
- Select Details at the end of the row and copy the
workloadId.
-
Set the
workloadIDvalue to theWORKLOAD_IDenvironment variable: -
Set the API token you generated to the
AQG_API_TOKENenvironment variable: -
Configure the necessary environment variables for your AQtive Guard instance and the Protect client. Replace
<YOUR-DOMAIN-HERE>with your specific cluster or environment identifier: -
Run the provided installer script from the release package to install the AQG Protect Client and AQG Protect CertSync service:
Configure OpenSSL to use Protect↑
To configure OpenSSL for AQG Protect, follow these steps:
-
Copy the
pkcs11.sofile from the release package to/usr/lib/x86_64-linux-gnu/ossl-modules/pkcs11.so. This file is the OpenSSL pkcs-provider.Important
Make sure to update the permissions of the
pkcs11.sofile by runningchmod 644 /usr/lib/x86_64-linux-gnu/ossl-modules/pkcs11.soso that other processes can load it. -
Copy the
libp11client.sofile from the release package to/etc/protect/libp11client.so. This file is the PKCS#11 Provider library.Important
Make sure to update the permissions of the
libp11client.sofile by runningchmod 644 /etc/protect/libp11client.soso that other processes can load it. -
Configure OpenSSL to detect the new provider by editing the
/etc/ssl/openssl.cnffile. In the[provider_sect]section, add the following line:This section of the file should look like:
[provider_sect]
default = default_sect
pkcs11 = pkcs11_sect

[default_sect]
activate = 1

[pkcs11_sect]
# This is the provider module we build and install
module = /usr/lib/x86_64-linux-gnu/ossl-modules/pkcs11.so

pkcs11-module-path = /etc/protect/libp11client.so

# This allows us to use the pem encoded uri file for private keys
pkcs11-module-encode-provider-uri-to-pem = true

# We don't store operation state in the pkcs11 interface
pkcs11-module-quirks = no-operation-state
pkcs11-module-allow-export = 1
pkcs11-module-cache-sessions = 0
activate = 1
Test the OpenSSL configuration↑
-
Set the
PROTECT_ADDRESSenvironment variable to enable communication with theprotect-clientbackground service by running: -
Confirm that the
protect-cert-syncservice has generated theprotect.cert.pemandprotect.key.pemfiles in/etc/protect/certs/. -
Start an example web server using the generated certificate and key:
-
In a separate terminal, test the TLS web server connectivity:
Configure nginx to use Protect↑
Prerequisites↑
- Verify that the
protect-cert-syncservice has generated theprotect.cert.pemandprotect.key.pemfiles in/etc/protect/certs/. - Make sure that nginx is installed on the system. If not, install it with:
Configuration↑
To configure nginx to use Protect, follow these steps:
-
Set Up TLS offloading by editing the
/etc/nginx/nginx.conffile. Insertenv PROTECT_ADDRESS;at the beginning of the file, and add thessl_certificateandssl_certificate_keyattributes within thehttpblock.Your
nginx.conffile should resemble the following structure:Nginx Configuration Fileuser www-data; worker_processes auto; pid /run/nginx.pid; include /etc/nginx/modules-enabled/*.conf; env PROTECT_ADDRESS; events { worker_connections 768; # multi_accept on; } http { #... #... # SSL configuration ssl_certificate "/etc/ssl/nginx/protect.cert.pem"; ssl_certificate_key "/etc/ssl/nginx/protect.key.pem"; #... #... } -
Configure nginx to listen for TLS traffic by editing the
/etc/nginx/sites-enabled/defaultfile. Modify the original HTTP (port 80) listeners to enable TLS traffic on port 443: -
Provide the Protect environment variable to the nginx service by running
sudo systemctl edit nginx.serviceto add a service-specific environment variable configuration. This command typically creates an override drop-in file (for example/etc/systemd/system/nginx.service.d/override.conf), so you don’t need to edit the main service definition directly. -
Reload the systemd daemon to apply the new service configuration:
-
Start the nginx service:
-
Test the nginx TLS web server connectivity:
Use a preconfigured Docker-based deployment↑
For containerized deployment, we provide a Docker image that runs nginx with native PKCS#11 integration. This image includes a watchdog process that monitors and automatically applies changes from Protect to nginx.
To deploy this nginx image with Protect via Docker:
-
Load the provided Docker image from the release package into the local Docker registry:
-
Configure access to the
protect-clientdomain socket: -
Start the nginx service:
Note
The <DOCKER-IMAGE-PATH> will be provided to you.
Understanding deployed certificate status↑
Once a certificate has been deployed, it’s State will be Active in the Certificates tab in AQG Protect. The Protect setting indicates whether the certificate is enrolled in Store & Track or Fully managed.
Troubleshooting↑
Check deployment health↑
Run the following command to view the live logs of the deployed protect-client service:
```bash
journalctl -u protect-client -f
```
Change the targeted service↑
To change the service that Protect is targeting:
- Modify the
workloadIDfield in/etc/protect/pc_config.jsonto use theworkloadIDof the new service you want Protect to target. - Restart the protect service: