Qualys↑
Integration with Qualys enables you to import scans from Qualys and generate a centralized cryptographic analysis of the available data:
- Secrets - In Qualys, container secrets are digital credentials providing identity authentication and authorizing access to privileged accounts, applications, and services.
- Certificates - Digitally signed documents used to verify the identity of a server or website.
- TLS Configs - Capture the cryptography used in a handshake between a client and server to negotiate the encryption protocols and algorithms used for secure communication.
Qualys requirements↑
- An active license for the following Qualys modules:
- Certificate View (CertView)
- Container Security
- The Qualys Gateway URL you will connect to. Refer to Identify your Qualys platform.
- A username and password for the Qualys admin account to be used for authentication.
Configure the Qualys integration↑
There are three main steps to configure the Qualys integration:
- In Qualys: Create an AQtive Guard role.
- In Qualys: Create an AQtive Guard user and assign the AQtive Guard role.
- In AQtive Guard: Configure the Qualys data source.
Create an AQtive Guard role↑
In Qualys, follow these steps to create an AQtive Guard role. For more information, refer to Creating a role in the Qualys user documentation.
- Log in to the Qualys Administration portal as an administrator.
- Under the Modules dropdown, select the Administration utility.
- Select Roles to open the Role Management tab.
- Select New Role to open the Role Creation window.
- Under Role Details, enter a role Name (
AQTIVE GUARD) and Description (optional). - Select Continue to open the Permissions tab.
Edit permissions for this role↑
Following the principle of least privilege, enable only the modules and permissions required for API access. All other modules and permissions should be manually disabled (unchecked).
- Under Edit permissions for this role, enable API Access by selecting the checkbox.
-
Search for the following required modules in the Modules dropdown and select them:
- Certificate View
- Container Security 3. To update permissions for each module, select Change and expand its list of permission groups. Configure permissions as follows:
- Certificate View module
* Under CERTVIEW Permissions, enable
CERTVIEW API Access.
-
Container Security module
* Under CS Image Permissions, select
List Image/s.* Under CS Permissions, select
CS API Access. 4. Once you’ve selected the required modules and permissions, select Continue. 5. Under Review and confirm role permissions, select Finish.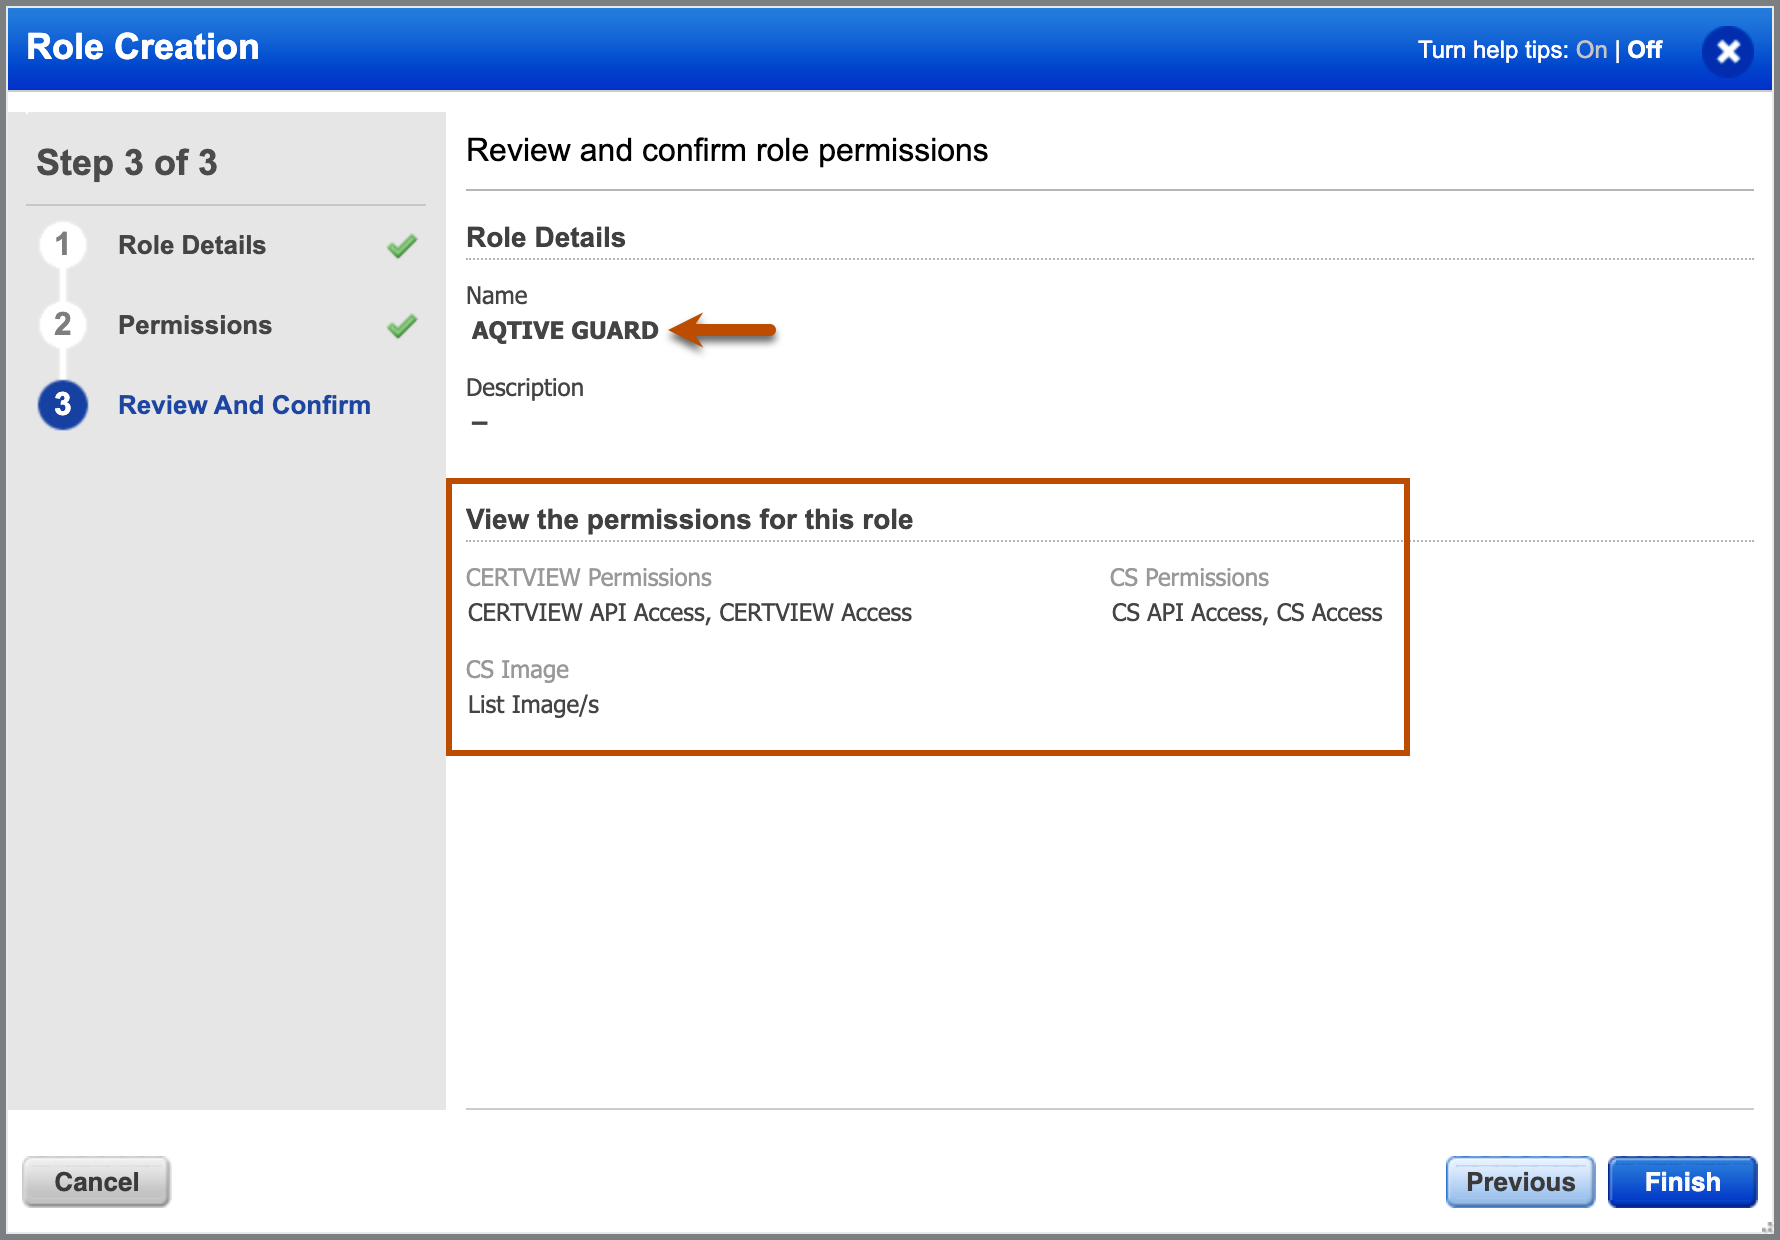
Create an AQtive Guard user↑
In Qualys, follow these steps to create an AQtive Guard user with the AQTIVE GUARD role.
- Log in to the Qualys Administration portal as an administrator.
- Under the Modules dropdown, select the Administration utility.
- Select Users to open the User Management tab.
- Select Create User, then select Create Manager User from the dropdown.
- In the General Information tab, complete the required fields for the Qualys admin responsible for the AQtive Guard integration.
- In the User Role tab, next to Allow access to: select
API. - Select Save to finish creating the user.
Assign the role to the new user↑
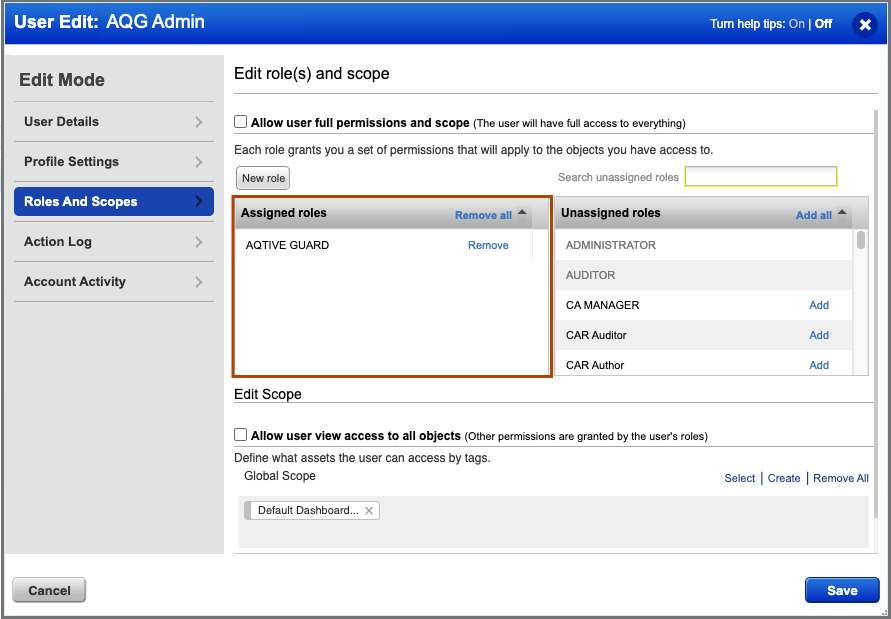
- In the Qualys Administration utility, select Users to open the User Management tab.
- Select the Username for the
manageruseryou created for the AQtive Guard integration, then select Edit to open the User Edit window. - In the Roles and Scopes tab, assign the
AQTIVE GUARDrole you created earlier. - Under Edit Scope, select Allow user view access to all objects, or adjust as necessary for your BU (required).
- Select Save to assign the role.
Important
View access permission is required to allow AQtive Guard to ingest Qualys data.
Configure the Qualys data source↑
Log in to AQtive Guard to complete the following steps.
- Select Data sources from the main menu, then select Configure in the Qualys panel.
- Enter the following information into the designated fields:
- Instance URL - the location of the Qualys API.
- Username - your username required to authenticate with the Qualys API.
- Password - password associated with the username for authentication.
- (Optional) Select Test Connection to check the connection to the Qualys API.
- Select Submit to update the settings.
Note
Selecting Submit performs the same check as the Test connection button, in addition to verifying the username and password are valid.
Use↑
Once the integration is configured, there are three types of Qualys ingestions available: Secrets, Certificates, and Handshakes.
Note
Only one type of ingestion can be active at a time.
All of these processes:
- Ping the Qualys API.
- Extract the relevant data.
- Map the data into the AQtive Guard format.
- Ingest the data into AQtive Guard for analysis.
Note
If the Qualys settings aren’t configured, the ingestion options will be disabled.
Ingest Qualys secrets↑
To ingest secrets data from Qualys:
- Select Data sources from the main menu, then select Details in the Qualys panel.
- Select Start secrets ingestion to trigger the ingestion of secrets data into AQtive Guard.
Ingest Qualys certificates↑
To ingest certificate data from Qualys:
- Select Data sources from the main menu, then select Details in the Qualys panel.
- Select Start certificates ingestion to trigger the ingestion of certificate data into AQtive Guard.
Ingest Qualys handshakes↑
To ingest handshake data from Qualys:
- Select Data sources from the main menu, then select Details in the Qualys panel.
- Select Start TLS configs ingestion to trigger the ingestion of handshake data into AQtive Guard.
View Qualys data↑
Once the ingestion is complete, any relevant data will begin populating. To find it:
- From Inventory, select either the Secrets, Certificates, Handshakes, Hosts or Container images tab, depending on the ingestion type.
Look for the Qualys tag in the Data sources column.
Unlink the Qualys integration↑
Unlink the Qualys integration only if your organization needs to reconfigure or stop data sharing with Qualys.
To unlink the Qualys configuration:
- Select Data sources from the main menu, then select Details in the Qualys panel.
- Select Unlink.